Chapter 1: Formulation
Foreword
Efficiency is everything.
Efficiency demands that we descend upon targets with a nimble dash; anything less would increase the total distance flown.
Efficiency demands that we break shields with a swift strike; anything less would increase the total damage absorbed.
Efficiency demands that we detect, navigate, move and kill as a sleek process with optimised component parts. To that end, the first mistake made by many pilots is to purchase a heavy combat starship.

Instead, if we can achieve firepower which approaches that of a heavy while also maintaining speeds typical of a lighter craft—excepting Enhanced Performance Thrusters of course—then we will reach our targets more quickly, and also support the prospect of deploying that modest arsenal more effectively.
Starship
Far at the zenith of ability to fulfil such a role are the Zorgon Peterson products of perfection, the Mamba and the Fer-de-Lance.
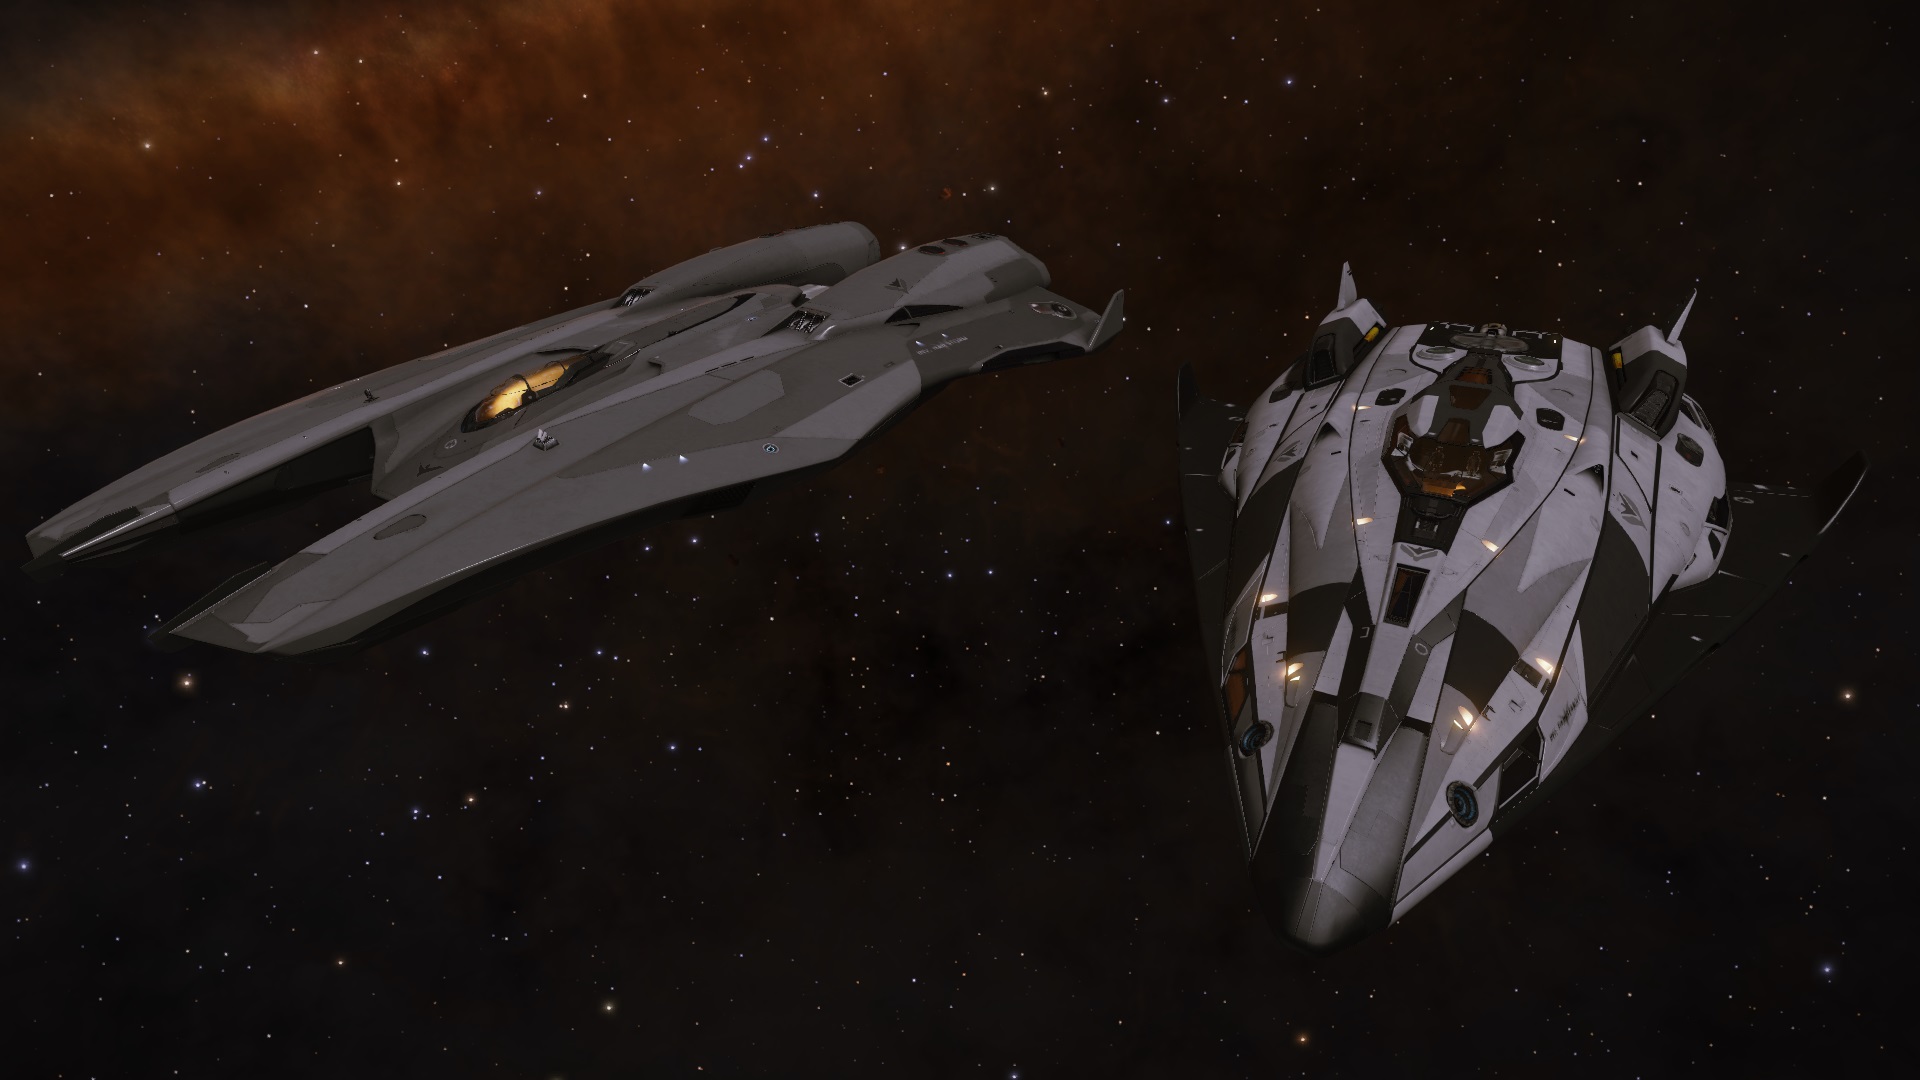
GalNet is already inundated with comparisons of these two massacre machines, and yet I must contribute my own if I am to elucidate my other choices more generally. I will focus on differences which are relevant and omit most properties which are equal, negligible or unimportant, save for one honourable mention—the superior speed of the Mamba versus the superior agility of the Fer-de-Lance, each of which I miss equally while out enjoying the other, and either of which is a valid basis for redesigning the loadout to satiate the desires of the individual Commander.
Of a bounty-hunting combat loadout intended for maximum situational coverage, I require the following:
- A fast damage option
- A steady damage option
- A threat to Shields
- A threat to Power Plants
- A variety of engineered effects
For the specific purpose of blasting bandits, the hardpoint class distribution and physical mounts determine my choice firmly in favour of the Mamba.
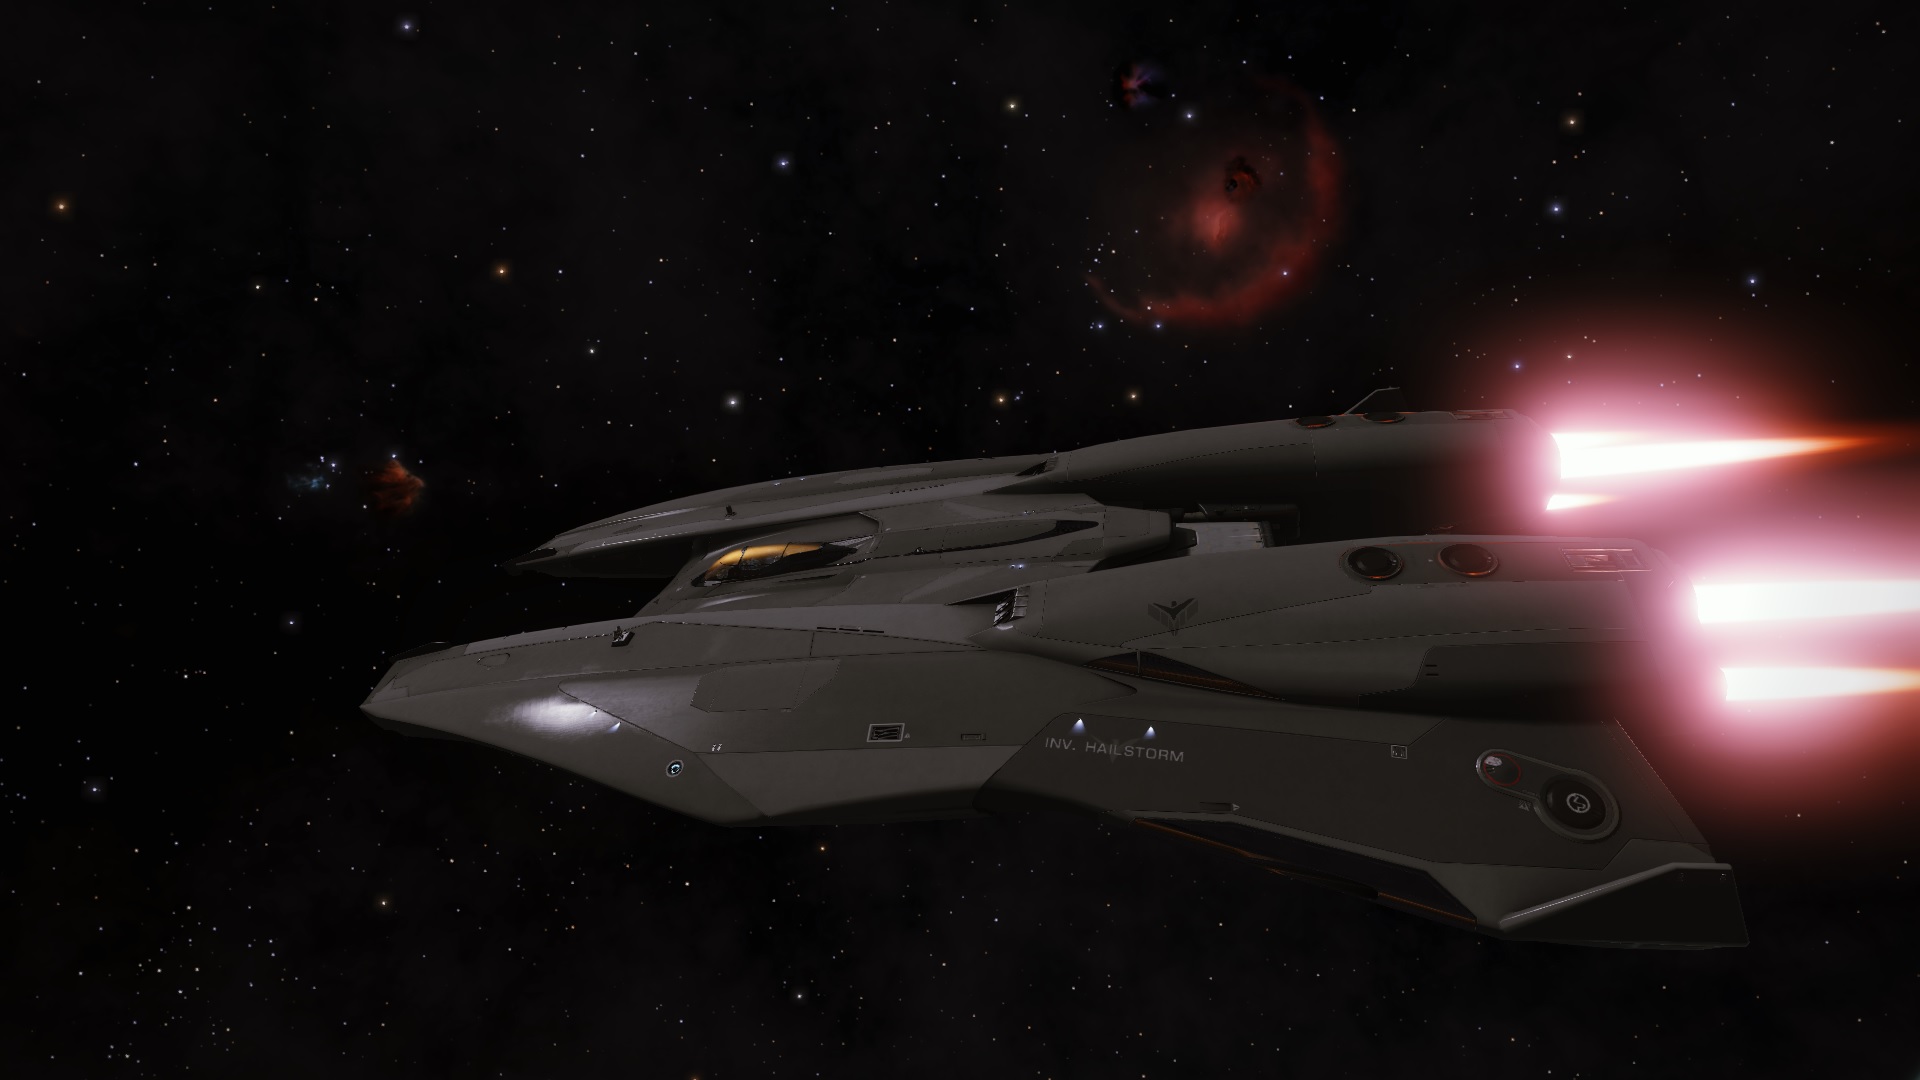
It is my observation that many Commanders consider this concept foreign to the extent of stigmatising the Mamba entirely, thus blinding themselves to the virtues I have discovered whilst piloting my mainstay, the Hailstorm. Remember that the agility of the Fer-de-Lance is not an active ingredient in delivering pirates to the Dark Abyss, and that you and your Mamba will have ample capacity for vectoring and orientation once you know where to find it. Such will be revealed.
Hardpoints
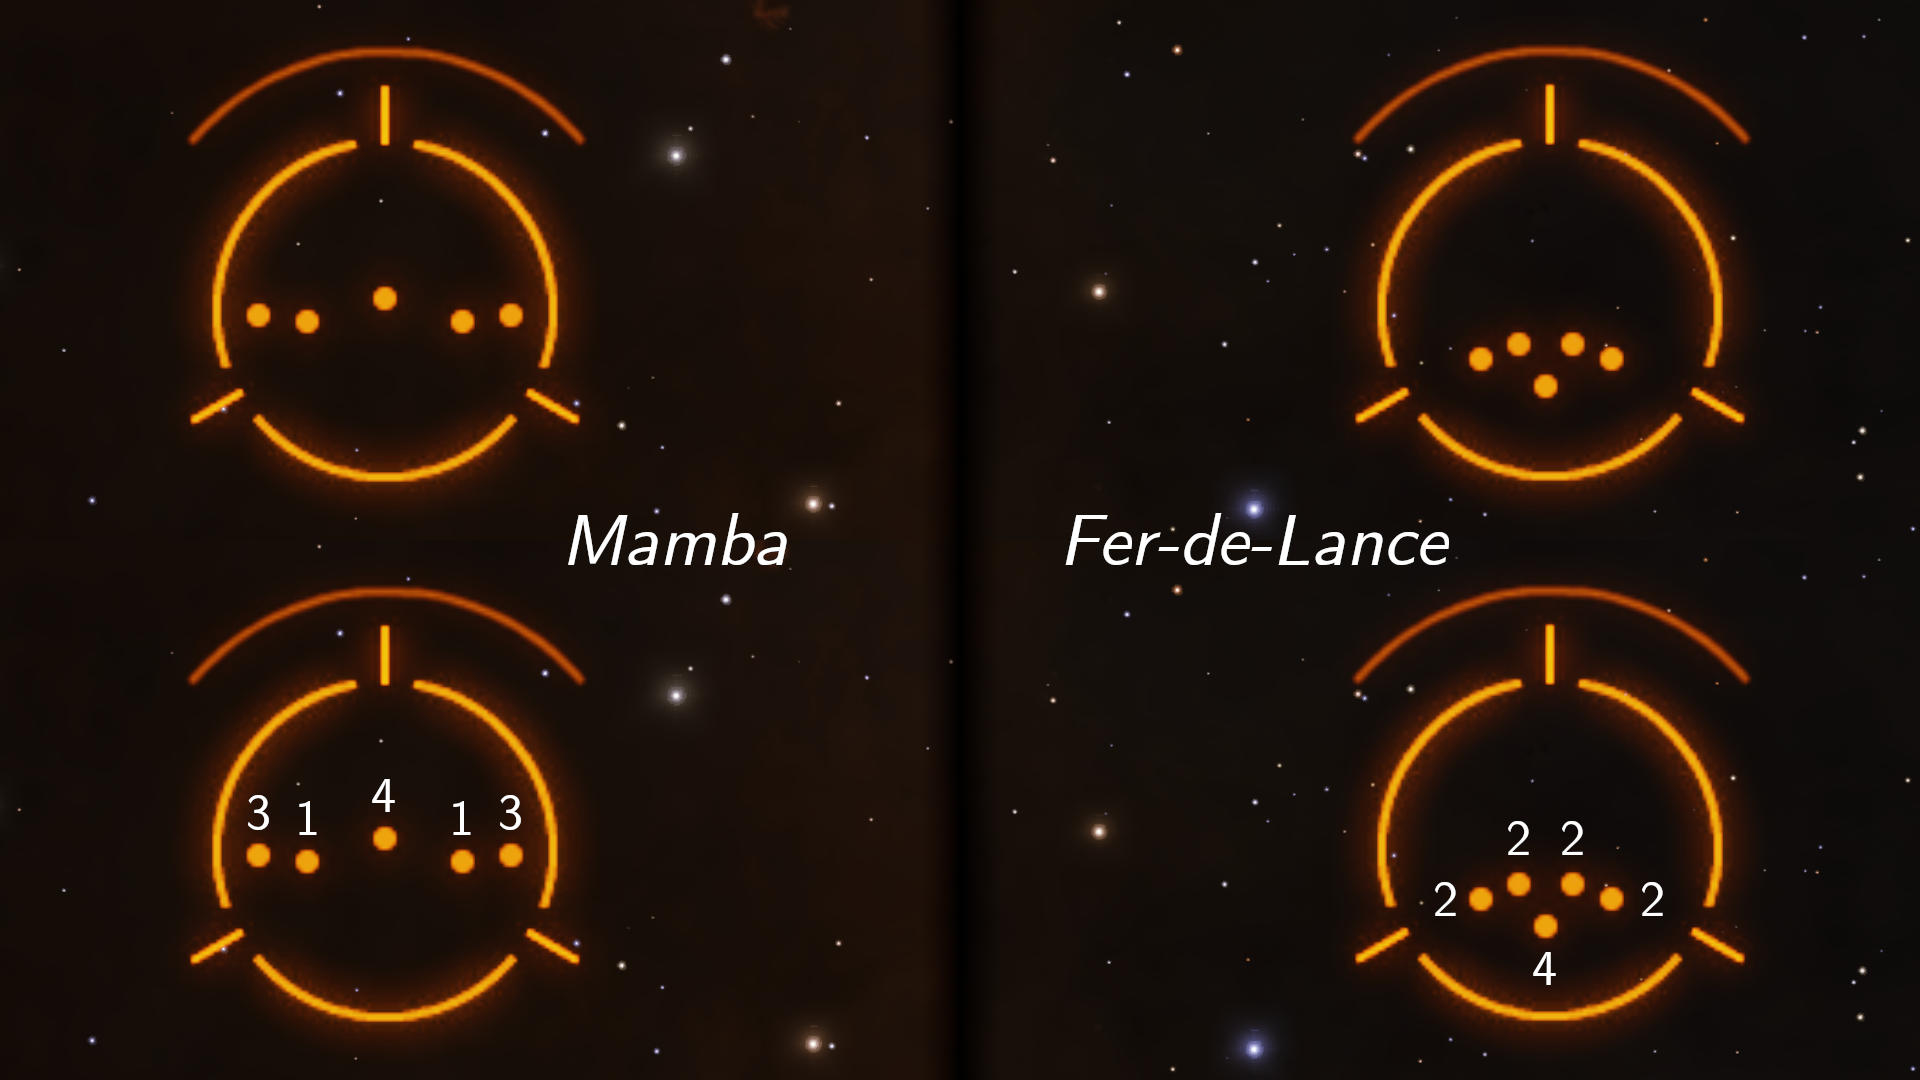
The Mamba and the Fer-de-Lance are matched in providing one class 4 hardpoint each, but differ in the Fer-de-Lance having an array of class 2 hardpoints where the Mamba instead diversifies them into half each of classes 3 and 1. This allows us to bias the majority of our damage output into those larger hardpoints while leaving the smaller hardpoints open for switching in different engineered effects as needed, a most versatile property which hastened our hardware qualification process considerably.
The loadout ideas in this chapter do not adapt well to the Fer-de-Lance, only adequately at best. Matching the damage of the Mamba class 3 hardpoints requires most if not all of the Fer-de-Lance class 2 hardpoints, and attempting my general Mamba strategy with a Fer-de-Lance incurs various other deficiencies, as you will soon understand.
Please acknowledge that this is by no means a prosecution of the Fer-de-Lance, but rather a magnified analysis of a few minutiae which favour the Mamba in a particular situation. A different basic design is needed to invoke the true strengths of the Fer-de-Lance, and the result will be a different weapon for a different purpose.
Power Plants
After its integrity is eroded, each additional direct hit against a Power Plant module has the potential to detonate its core immediately, tearing out its internals and causing a chain reaction which eventually ignites the fuel supply. This is an important vulnerability which gives us a dual approach to combat, for which my terms are destruction and exsection.
For striking effectively at the Power Plants of targets which have softer modules than they have hulls, gimbaled weapons will be needed for focusing them all onto a single point. On the surface of each starship, observe not the lateral positions of the hardpoint mounts, but their orientations. All five Mamba hardpoints sit along the top surface with excellent shared arc visibility.
This is in stark contrast to the Fer-de-Lance having two atop, one each on opposite sides, and the class 4 hardpoint mounted beneath.
This places most of the class 4 arc well beyond the Fer-de-Lance pilot vision, and moreover makes converging gimbaled weapons require such specific aiming that the loadout might as well be replaced with all fixed weapons, with which the Fer-de-Lance excels to the extent that Commanders wishing to use one should instead begin with a class 4 Plasma Accelerator and build the remainder around that.
Damage
Steady damage is well-addressed by fitting a Beam Laser to the class 4 hardpoint, a position which is otherwise quite limiting in which types of weapon can be used without resorting to a smaller class. As a final point of emphasis against outfitting a Fer-de-Lance this way, observe that Zorgon Peterson was forced to design a shut-off mechanism which prevents a parallel-facing Laser or Cannon from wrecking the landing gear, a problem not present when using a Plasma Accelerator or Multi-Cannon. It seems to me that few Commanders understand why this is significant. Again, such will be revealed.
The two Mamba class 3 hardpoints are perfect for supporting a pair of Fragment Cannons; applied appropriately, these are the most devastating personal starship weapons our factories have ever produced. Some care and spatial awareness is advisable before unleashing them; unfortunately, the abysmal cognitive function within the Pilots' Federation leaves its staff with no equivalent phrase which means "two-for-one", their closest approximation being "reckless weapons discharge". They do their poor best, I suppose.
Engineering
The Fragment Cannons are best served with the Overcharged modification; Double Shot will expend far too much ammunition, and I find that High Capacity takes too much time to deliver the payload. At least one weapon should be fed with Incendiary Rounds, and both should if Commanders find that one volley fails to break all but the highest-class shields. I am quite happy to leave one Fragment Cannon with primarily Kinetic damage, so I have taken the opportunity to fit Drag Munitions. Note that while Corrosive Shell is desirable, the resulting capacity reduction is not.
Given the heavy bias towards close-range damage, I follow that with a Short Range modification on the Beam Laser, and also pair that with Thermal Vent such that I can eschew heatsinks. Thermal Vent reverses the additional Short Range emissions to become additional cooling instead, and the effect is strong enough to support a Shield Cell Bank without reaching critical temperature, even with some overcharging of the Power Plant. At all other times, it keeps the core nicely frozen.
An alternative approach is to improve the fall-off of the beam so it doesn't lose efficacy beyond 600 meters, but for the sake of the Fragment Cannons I prefer to solve that problem spatially.
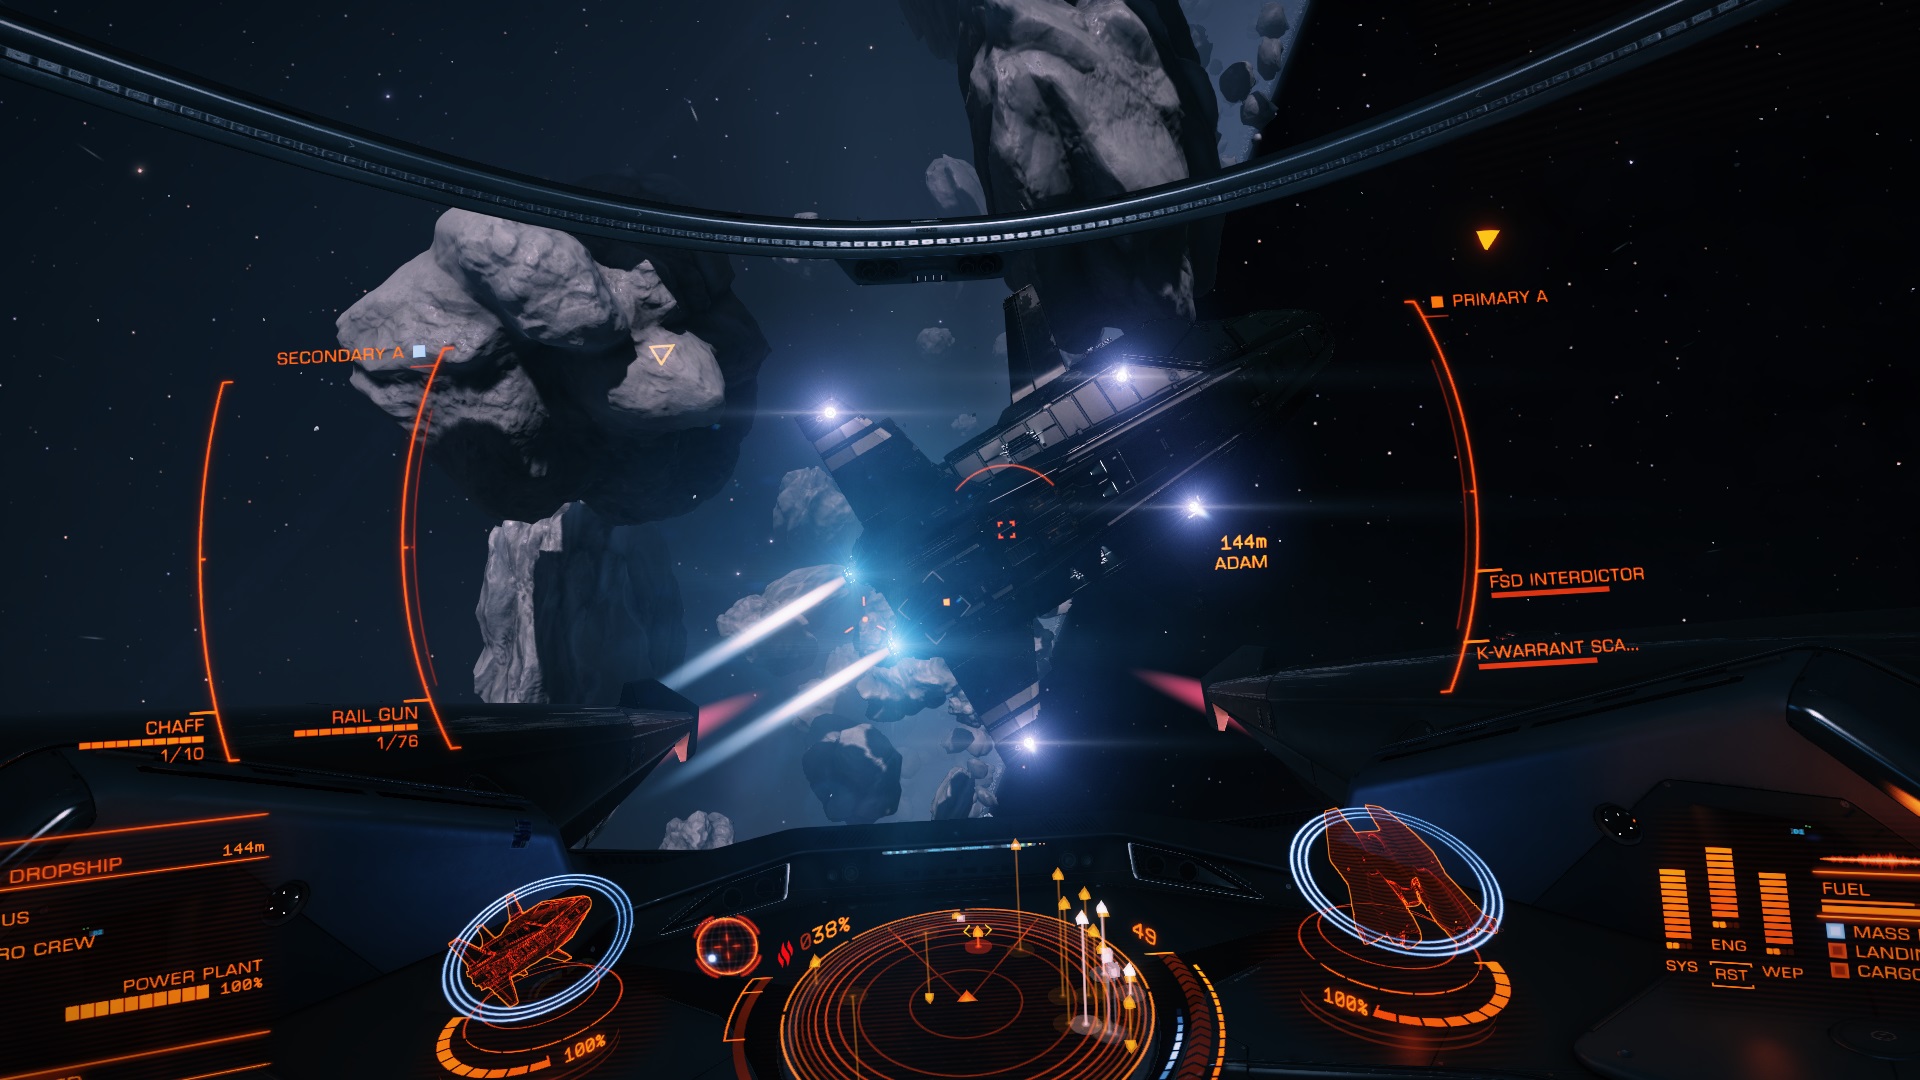
With excellent damage stacked onto the best hardpoints, we have plenty of freedom to explore several class 1 options and their possible effects, and these should be considered as open for individual Commander preference. A Multi-Cannon with Corrosive Shell is a popular option, and I usually also bring a Rail Gun with Feedback Cascade if needed or just Oversized¹ otherwise, for it always pleases me to deliver the highest piercing capability with a weapon class which is usually lacking. Cold targets are not a common problem, but some Commanders may nevertheless wish to bring another Multi-Cannon with Emissive Munitions, or perhaps opt to deploy explosives.
1. I understand why many Commanders prefer Super Penetrator, however I find it much less suitable for this purpose. Its reduction in thermal load is superfluous when you have Thermal Vent, and if a shot is going to miss the Power Plant then I would much prefer that it becomes lodged and helps crack open the hull (dual approach, remember). A Super Penetrator round has an incredibly clean entry and will only harm the hull via the vehicular equivalent of an exit wound, which will not happen if it strikes some other unimportant module instead, of which there is significant risk. The only real advantage is that it can damage the Power Plant while facing the front of the starship, which is a poor investment unless we redesign completely and make that the plan from the start.
Protection and utility
As a footnote more so than as an instruction, the defensive equipment aboard the Hailstorm consists of a Bi-Weave Shield, four Shield Boosters, two Shield Cell Banks and a Chaff Launcher. The shield is not intended to break during normal operation, but were that to happen it has Reactive Surface Composite bulkheads and two Hull Reinforcements as backup, where the bulkheads are Lightweight to keep boost speed above 600.
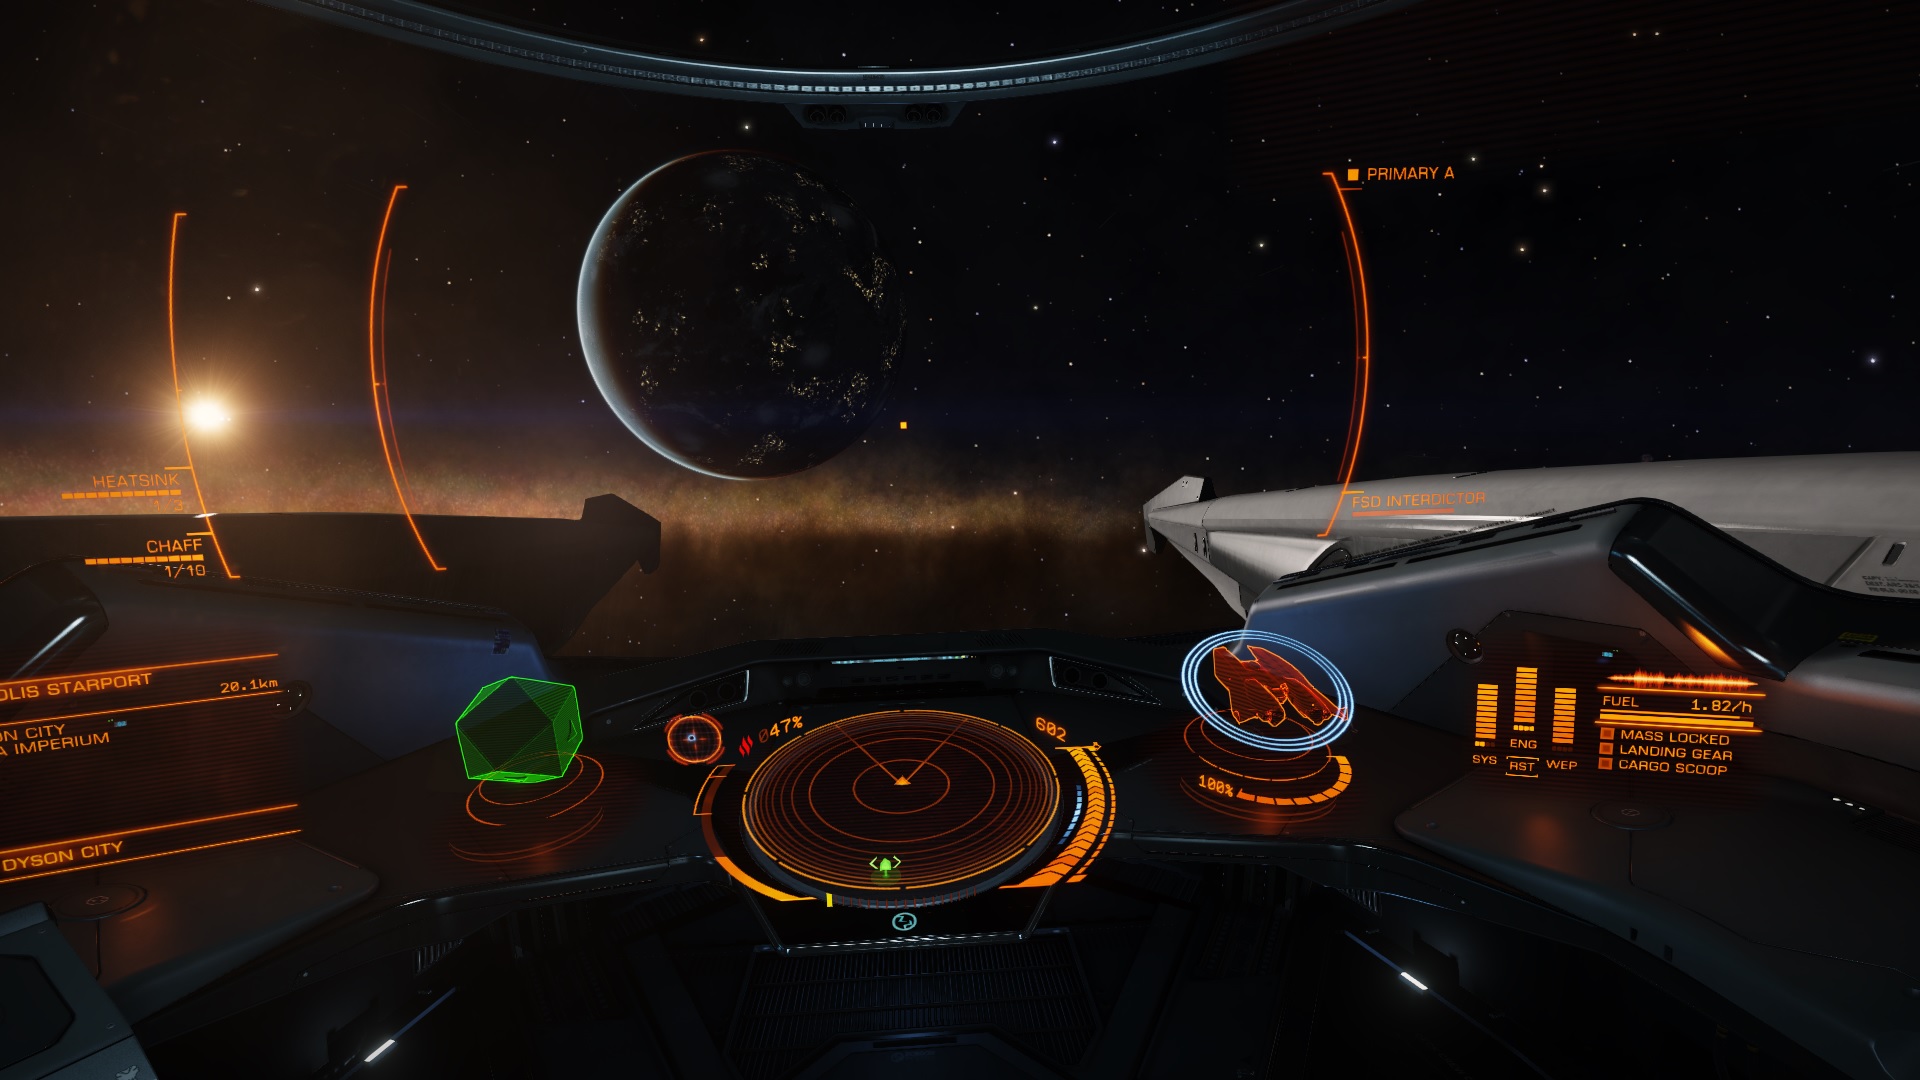
All protection is otherwise engineered for high, balanced damage resistance, save for one Heavy Duty Shield Booster. A moderately fast Kill Warrant Scanner is also a must, and I keep a class 1 Frame Shift Drive Interdictor ready for special occasions.
When equipping a Mamba with a Chaff Launcher, please give special attention to the utility hardpoint locations, specifically the two which are very close to the pilot on either side. Chaff glows vividly when deployed, and can occupy much of the view from within the canopy; personally I find this to be very pretty, but pilots for whom this would be distracting or blinding should fit Shield Boosters in those locations and move the Chaff Launcher elsewhere.
The one utility module I will specify directly is that you procure the best A-rated Sensors and engineer them for the longest range possible. If you have never flown with this particular luxury before, trust me—when you start detecting heavy ships at 13 kilometers, you will be amazed at how you ever tolerated being so blindly unaware of your prey.
Fire Groups
Having ingested the weapon specifications above, surely it will not escape the notice of astute Commanders that I am prescribing a peculiar combination which spans three different projectile speeds and has various situational effects we will want to manage individually, making the Fire Groups difficult to devise. This is true to an extent, though also not quite so bad that we cannot have one of our groups contain all of the weapons in a useful or meaningful manner.
My original configuration used five Fire Groups, which I have retained and will present here in full, despite since becoming much more generous with my Fragment Cannon doses in a way which could make a case for reducing this down to three. I will begin with the five-group layout and explain my original reasoning.
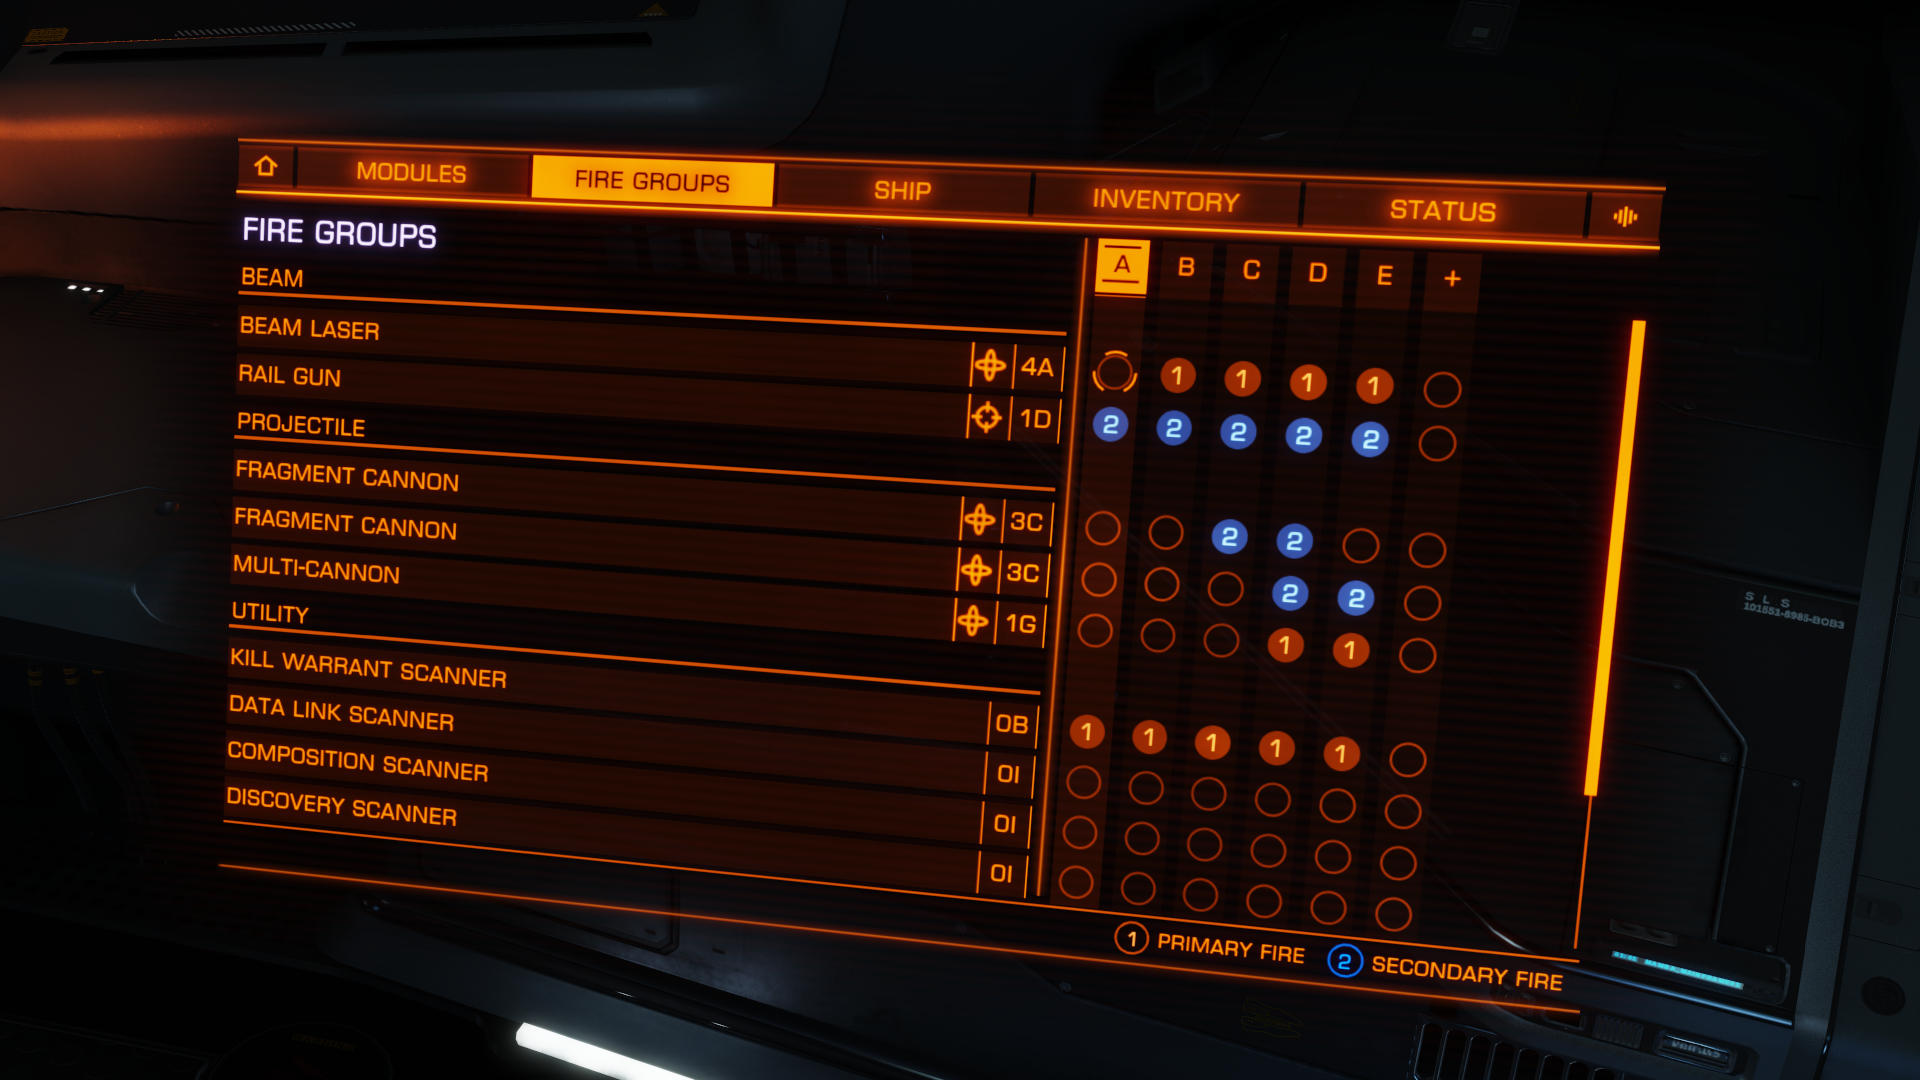
Of note are the following:
- Automatic weapons are on primary, along with the Kill Warrant Scanner in every group so that I can choose to get started with the Beam Laser while the scan completes.
- Single-fire weapons are on secondary. The Rail Gun warm-up works nicely together with the single trigger mechanism of the Fragment Cannons; we can tap the trigger to deliver only the pellets, or hold the trigger to follow up with the high-velocity round afterwards. Most of my Fragment Cannon uses involve a tap-tap-tap or tap-tap-hold pattern. It is possible to output two Rail Gun rounds during a Fragment Cannon reload, with a little extra time to spare for aiming.
- Group A was originally scan-only with zero weapons. Extending the Rail Gun to it was a more recent change I made during the neo-Marlinist incursion so that I could loop around past group A without disrupting its warm-up, but I ended up keeping it there so I could use the Rail Gun during a scan while also choosing not to use the Beam Laser.
- Group B is simply medium-range weapons only. On some occasions I also need occasional Multi-Cannon bursts, which I accomplish by cycling to group D and back.
- Groups C, D and E were designed as an organised three-act performance:
- Group C has the Incendiary, for opening with shield damage.
- Group D gives a burst with all weapons, intended to prevent a Shield Cell Bank having time to operate.
- Group E has the Drag Munitions and Corrosive, for closing with hull damage.
Of course, that application of group E betrays the fact that this was devised prior to noticing how delectably effective the Fragment Cannons could be when discharged directly into a Power Plant. To use our modern INIV parlance, it was not designed originally with exsection in mind, only destruction. Regardless, this is still my present configuration, but please understand that such is almost entirely due to personal familiarity. Groups C and E are seldom used now, and even then it is mostly just for equalising my ammunition expenditure as opposed to the original purpose.
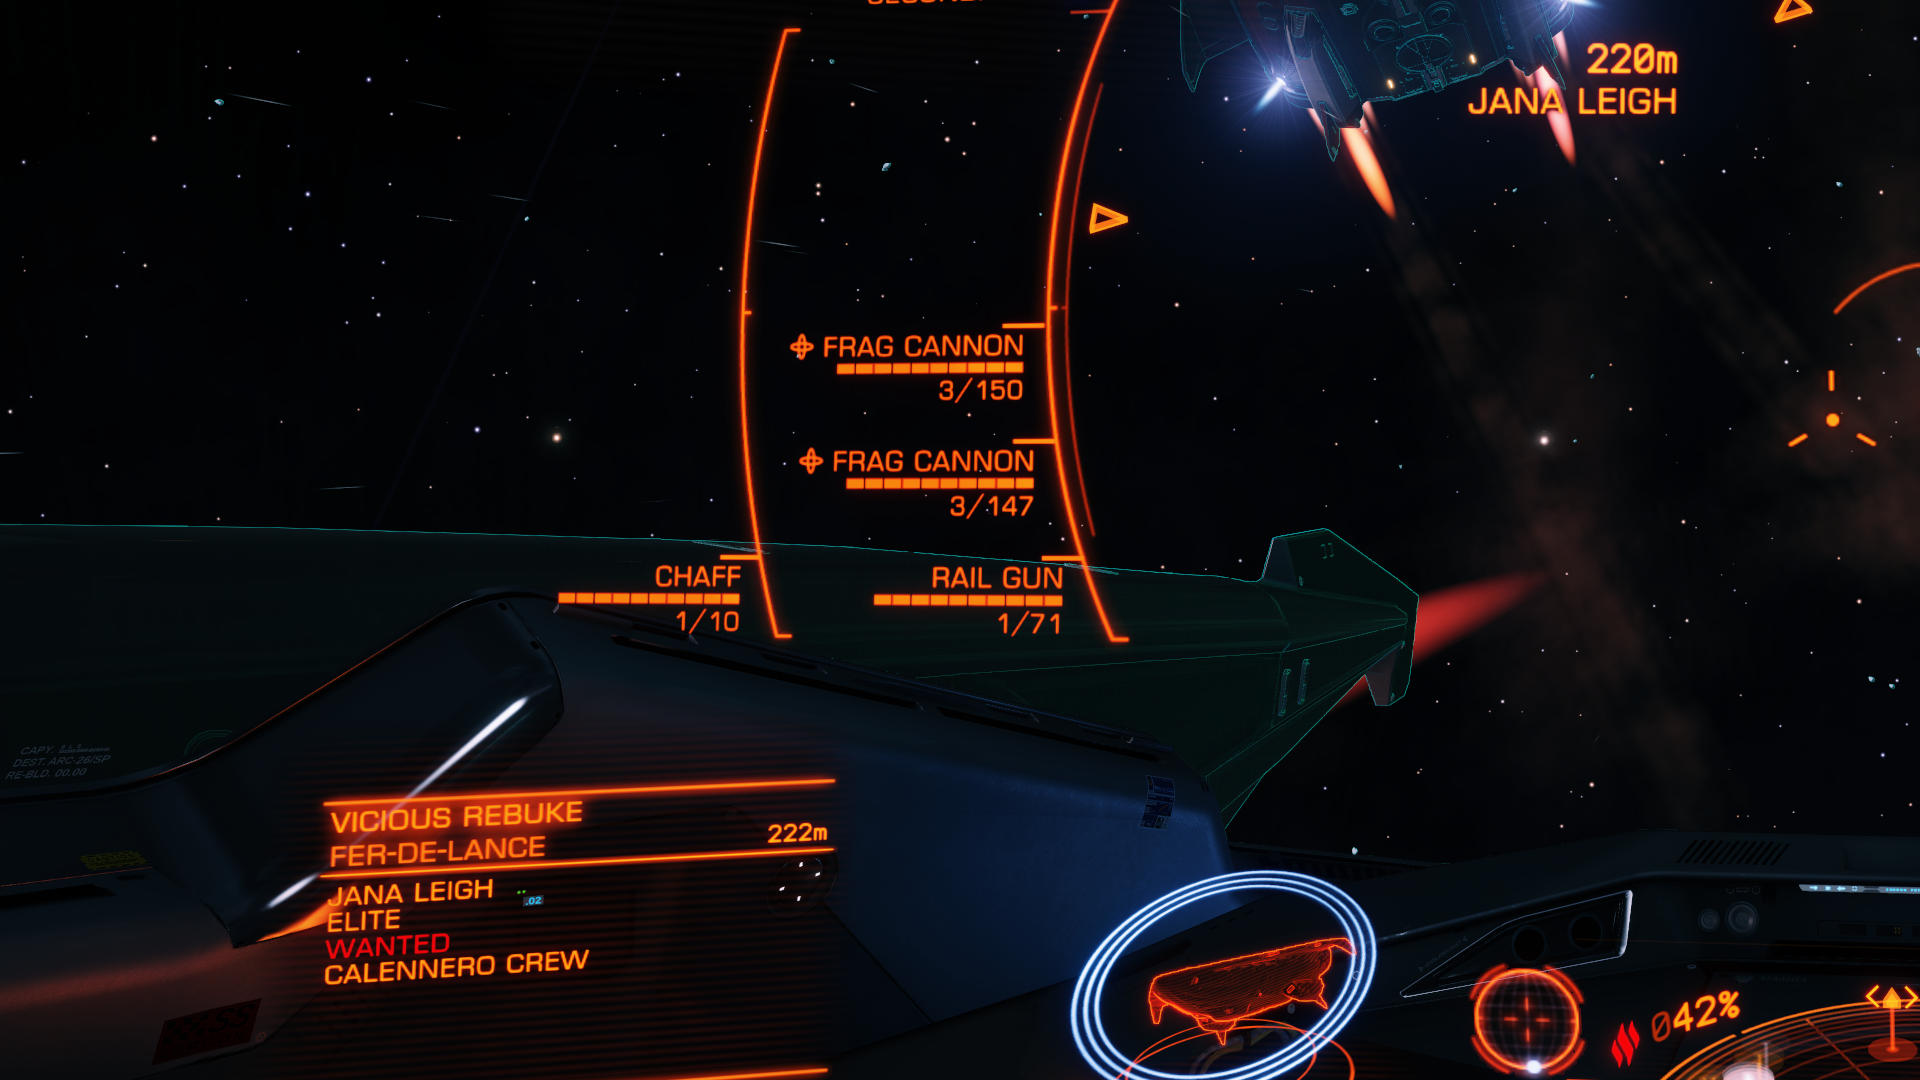
As I implied above, I now almost always cycle directly to group D when I want a Fragment Cannon volley. I have minimal regard for optimal use of ammunition types against shield, hull or Power Plant, and the reason for this is simple: it costs time. I have always disliked the proponents of pure laser weaponry who consider restocking to be wasteful of time without accounting for the mediocre output they are content to tolerate, and groups C and E were originally a moderation effort to weaken that argument by prolonging the ammunition I had. The Brewer Corporation has since changed that; I now just jump my personal supply dock, the Light of Achenar, directly beside my arena so I can expend and restock as I please.
That was a lot of background for what could have been presented as a simple instruction without justification, but in this case I found it particularly important that you understand my thoughts at least as well as my actions. Now that you know how I arrived at that configuration, please feel free to begin with this simplified three-group version and invoke your own preferences in deciding whether to expand it to four or beyond for finer control in some way.
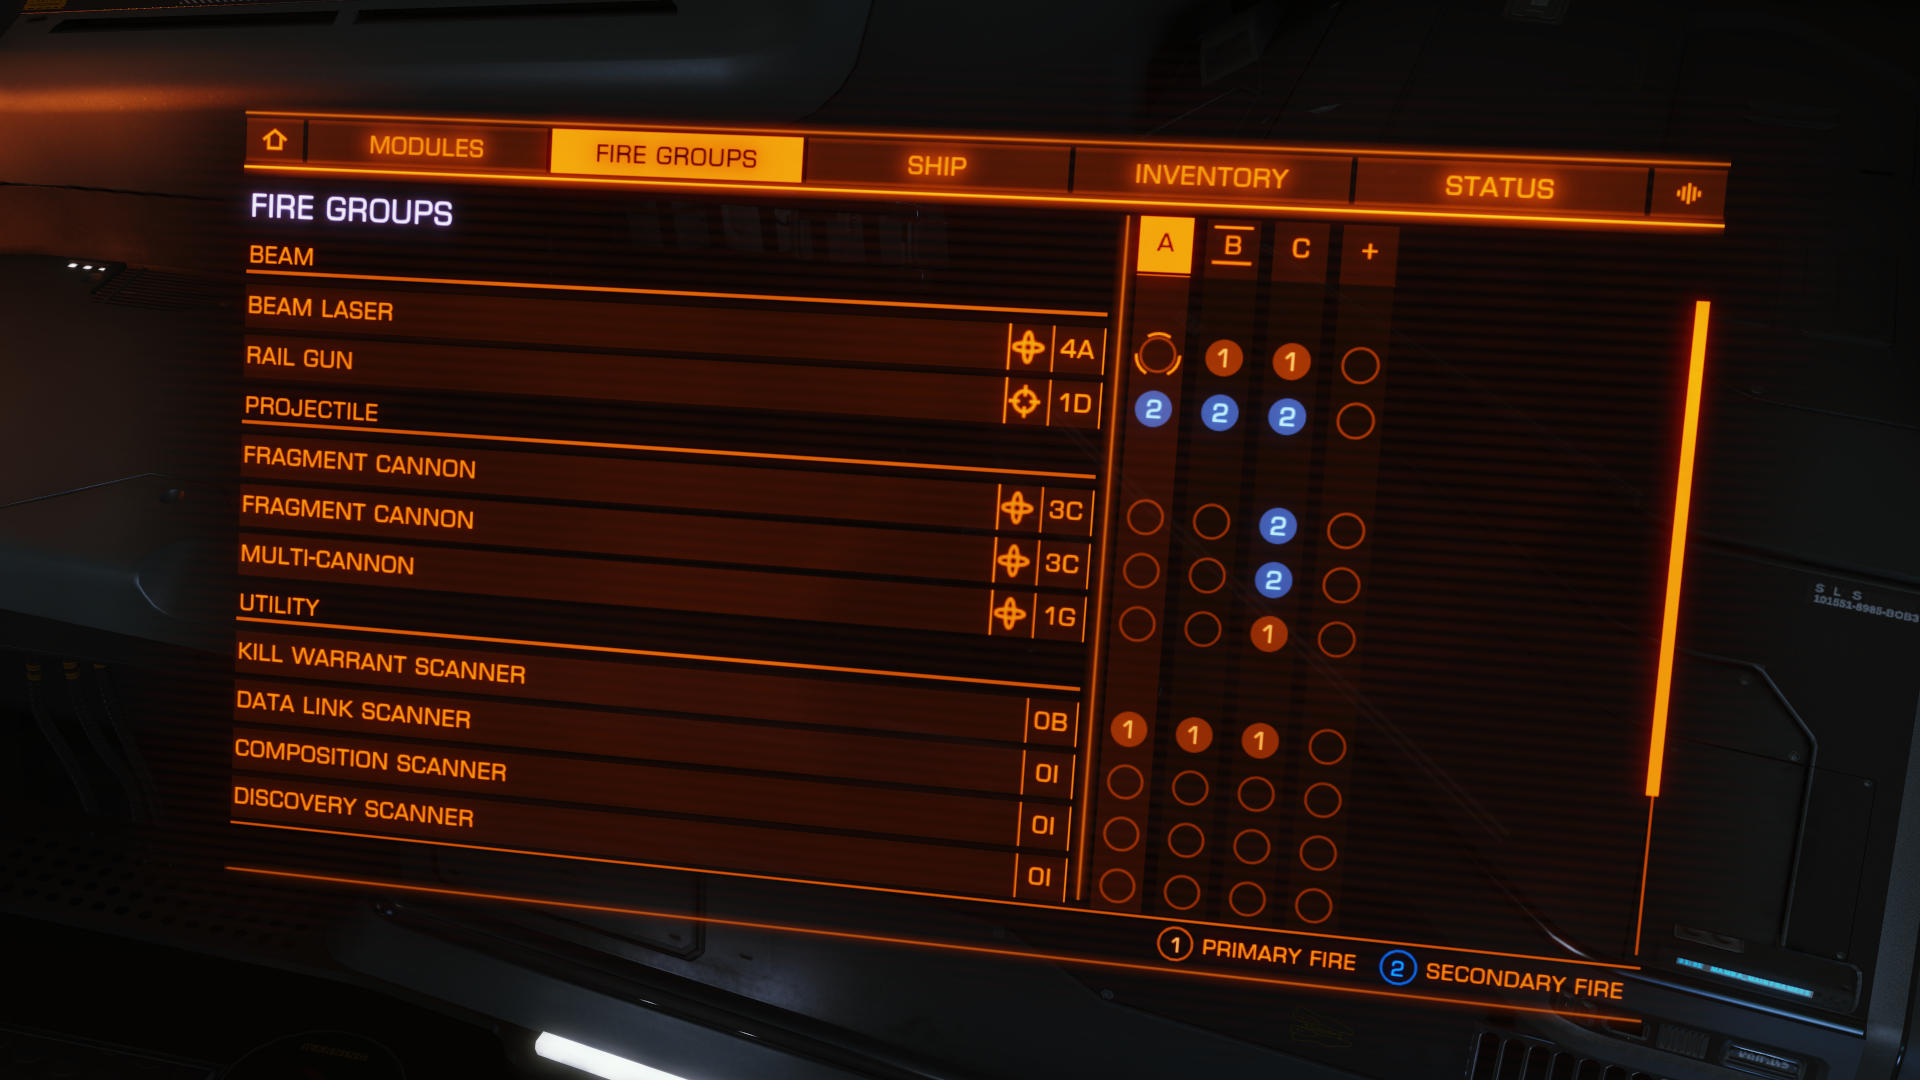
There is nothing special here; it is the same as before but without groups C and E, such that the previous group D is now named C. Use C here when you want a Fragment Cannon volley and/or a Corrosive burst, then switch back to B. I have tried this myself, and it has my approval as a decent and simple setup with almost identical coverage of my use-cases (and minimal retraining from being accustomed to five groups, as it happens). I will continue to use it for a while, and ultimately adopt it myself if I feel no major negative impact from losing the ability to operate the Fragment Cannons individually.
To end with a couple of minutiae:
- Even with five groups, I have spent much of my combat time only cycling forward, looping around if needed. I now use buttons for cycling both directions, but please be aware before indulging in this particular luxury¹ that the third chapter of this article will call upon your limited button supply for far more important starship functions.
- Some Commanders may wish to set their Frame Shift Drive Interdictor as primary in all groups. Personally I keep this only in group A to reduce the holographic interface clutter—as if I needed a aesthetic reason to detest heavy starships for combat in addition to the practical reasons already conveyed.
1. My situation is far more dire than you would think. The fact that somebody at the Pilots' Federation made the inexplicable decision to blight every standard starship interface with the inability to cycle forward through Fire Groups while docked, added to my discovery that Fire Groups can be cycled in reverse while docked within minutes of budgeting a button for doing so, together gives me strong dose of intense, vengeful delight as I operate that function incessantly in defiance of whatever ill-conceived idea they had in the first place. Activate it if you will, but beware my dragging you down that way. Or up, I suppose, if you wish to join me in enjoying petty gratification.
Afterword
By discussing my ideas and reasoning rather than simply releasing a set of list items, it is my hope that Commanders think more on why a configuration works—or even just has some potential to work—and apply that thought process when evaluating other recipes in the future.
If you have followed thus far, you now have an outline view of what hardware to purchase, and an opportunity to take it for a test flight and build some familiarity—before the real trial begins.
Original loadout
Reinforced shield (requires Guardian module)
Kinetic resistance (requires Guardian module)