Chapter 2: Aviation
Foreword
The rudimentary flight training offered by the Pilots' Federation is not nearly enough to be considered a bare minimum. This chapter is designed to continue from the point at which their education ends, to explore the flight-related starship functions more fully, and to develop a deeper understanding of their abilities, limitations and implications.
This alone will not turn you into an elite duellist by far, however it will definitely help newer pilots engage, reposition and reorient much more quickly. My wider hope is that it will give most pilots at least one new flight trick, and with it that delightful double-feeling of empowerment and excitement as one also realises a greater extent of astronautic possibility.

Also severely lacking in coverage at the Pilots' Federation is their basic starship maintenance, for it omits care of the most important part of any starship: the pilot. Bad posture and tense usage of flight controls is liable to strain your fingers, wrists, shoulders and back, so always perform full routine stretches before launch and after docking. Keep all of your muscles sufficiently supple, seat yourself comfortably, ensure you can reach everything you need without burdening your arms, relax your grip¹, and check periodically that you are able to form a claw, a fist and a salute² without experiencing any cramp in your hand or forearm. Your flight suit gloves should feel light and soft, but should not insulate your hands to the point of discomfort.
Moreover, remember that you are a human first and a pilot second. Modern flight and interstellar travel can be taxing enough even without a hostile operating environment, so please care diligently for your health, strength, fitness, happiness, natural beauty, mental acuity, and sanity. Sobriety also seems to be in decreasingly sufficient supply in the 34th Century, however it is recognised that some mild substance use can calm the mind and nerves without impacting function or judgement, and thus remains at the discretion of the individual pilot.
1. Referring to your hand as opposed to the flight stick itself, which should be very much fastened securely to its pitch shaft. Occasional inspection of cams and electromagnets—or indeed springs, if somehow you ended up with a Lakon Spaceways product—would also not go amiss.
2. An actual physical gesture, not a pitiful "Oh-seven, Commander" wheezed insincerely over the comms.
Location
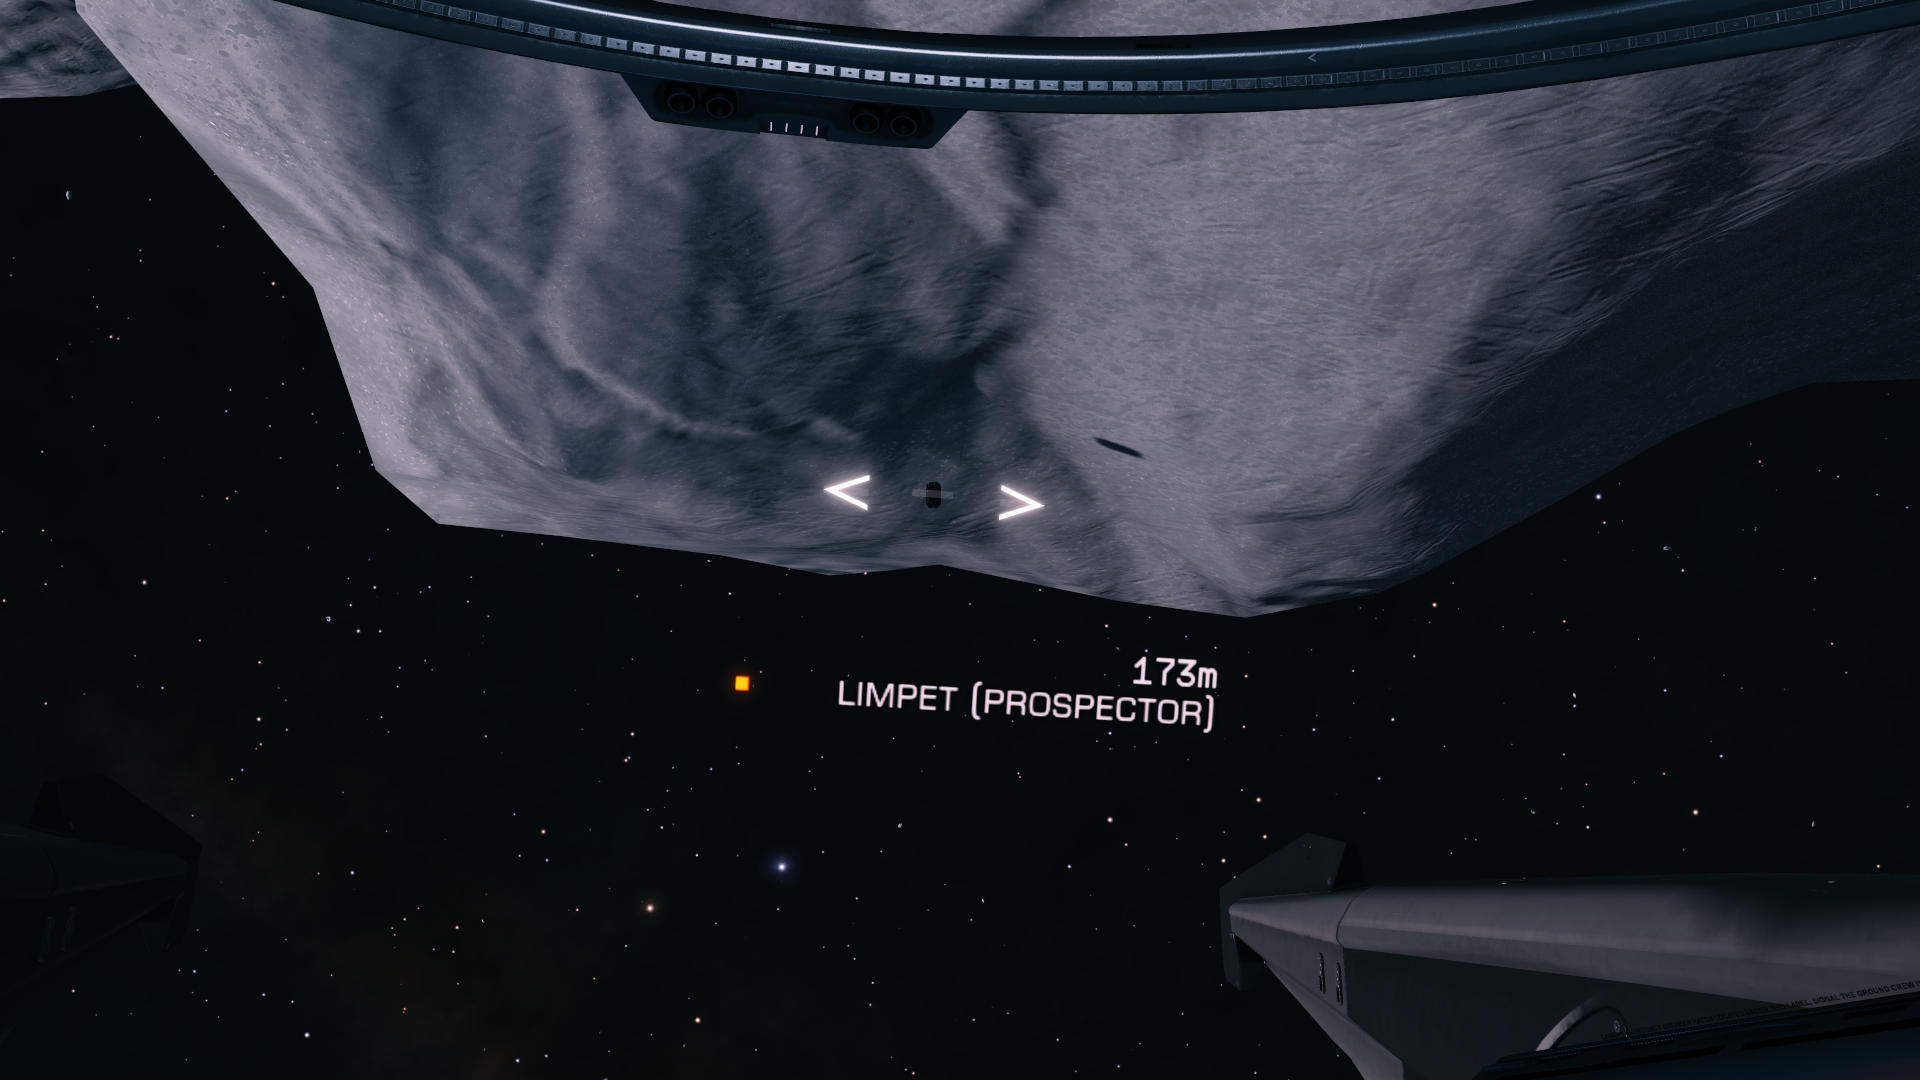
One of the best places to use for flight testing is some quiet spot within an icy asteroid ring, where the asteroids provide a stationary relative position reference and ample supply of obstacles. They can also be marked by use of Prospector limpets if a distance readout is desired, either via temporary replacement of your defensive measures to make room for limpets and a controller, or with the assistance of a training partner. Prospector limpets do not expire, and a 1A controller will function at a range of seven kilometers.
A partner could also provide a ship-launched fighter to function as both a marker and a reference point. Only use a starship directly for this purpose if the safety risks are acknowledged, and especially if one also decides to make the most of the occasion by mining asteroids during the flight exercise.
If at any point a flight-related question arises in your mind, please do not wait to find out when or if I answer it for you—make a prediction, devise a practical test and find out what happens for yourself. The Galaxy is filled with questions which derive from casual curiosity but evolve into new methods and increased success.
Flight Assist
I must address Flight Assist first not because I actually want to use it as a starting point, but because it will interfere with basic demonstrations. It is enabled on every starship by default, and is even presented as an interface alarm when disabled.

Flight Assist is a digital control loop which steadies your starship by working constantly against any movement or rotation, including movements and rotations you are attempting intentionally. While enabled, each of your thrust and spin controls operates an indirect velocity setpoint value which Flight Assist then attempts to satisfy. Releasing the controls is equivalent to feeding Flight Assist with setpoints of zero for all thrust axes and all rotations, hence its stabilisation effect. Without Flight Assist your controls become acceleration setpoints directly to your thrusters; releasing the controls will stop any acceleration, but existing velocity will continue until you apply opposing acceleration.
Independently of that, Flight Assist is also one of a few functions which adjust your thruster profiles while active, normally gaining a little under one percent extra forward speed but at great expense of lateral, reverse and rotation speeds. We will return to Flight Assist in a more practical capacity later in this chapter; for the moment, what matters is that you understand that I am disabling it only so I can demonstrate other effects without also having to explain what Flight Assist is doing or what observable difference is due to its meddling. Consider said explanation delivered and out of the way.
This yields an important safety protocol, though. For the purposes of this exercise, if at any moment your starship is out of control and you need it to come to a complete stop, you can enable Flight Assist, zero the throttle and center the flight stick. Flight Assist will cancel your movement relative to the obstacles.
As a future precaution, that is only true when the Flight Assist reference frame equals the obstacle reference frame, or when in the docking area of a functional Starport where Rotational Correction is available. When performing a flight exercise within a moving or rotating structure, do not enable Flight Assist under any circumstances. Such an exercise is inherently dangerous in that you have no means to abort other than using the very skills you are trying to improve, and enabling Flight Assist will only make an unstable situation much, much worse.
Boost
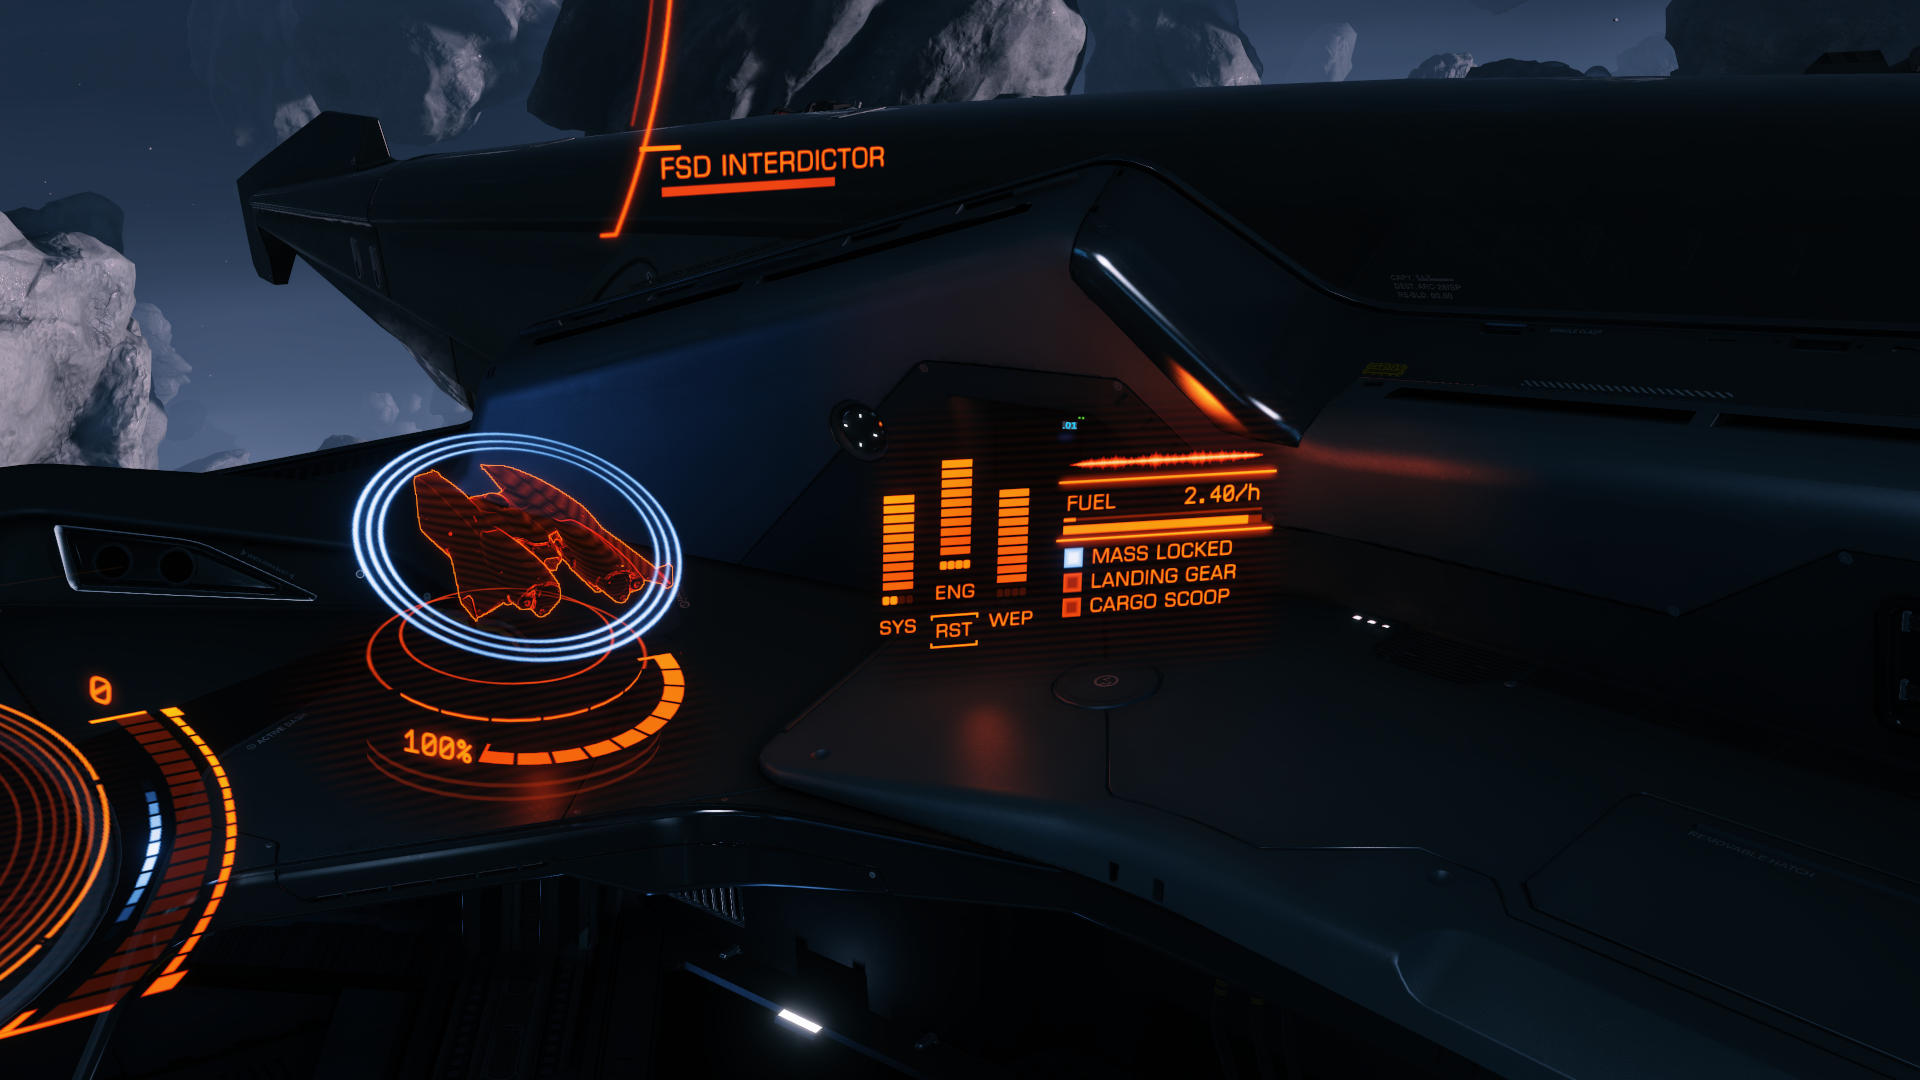
The single most versatile flight utility any starship possesses is its boost function, the study of which will form the basis for the remainder of this chapter. Set your Power Distributor to maximise ENG, and unless you intend testing your hull repair costs, I suggest placing its remaining power into SYS to bolster the damage mitigation of your shield.
The first thing to establish in your mind is exactly what boosting does. This is not a trivial thing to define, given that no single concise sentence will ever describe the boost function completely, so if your present notion of it is simply "provides instant forward speed" then please tear that down mentally and allow me to rebuild it step by step.
With the aid of a reference point, disable Flight Assist so that nothing else affects the result, then begin by observing speed and distance when boost is activated from a stationary state.
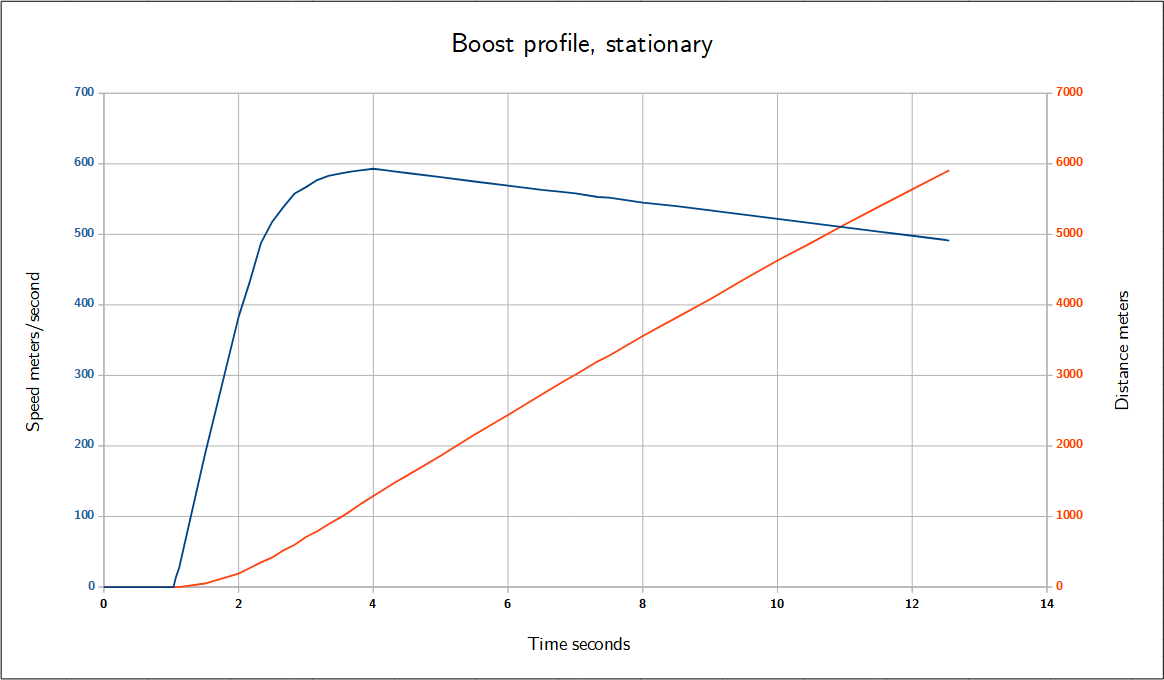
The boost effect begins at one tick after activation, followed by one tick each of strong acceleration, ramp-down, then weak acceleration ending exactly four ticks after activation. My limpet-laden Mamba reached a peak speed of 593, which then drops gradually back down to a natural safe maximum speed of 491 once the overriding effect of the boost expires, that speed being achievable without boosting.
A notable property of that profile is that the speed did not actually stop increasing during the boost effect. Try testing its limits by boosting while already moving forward at maximum speed.
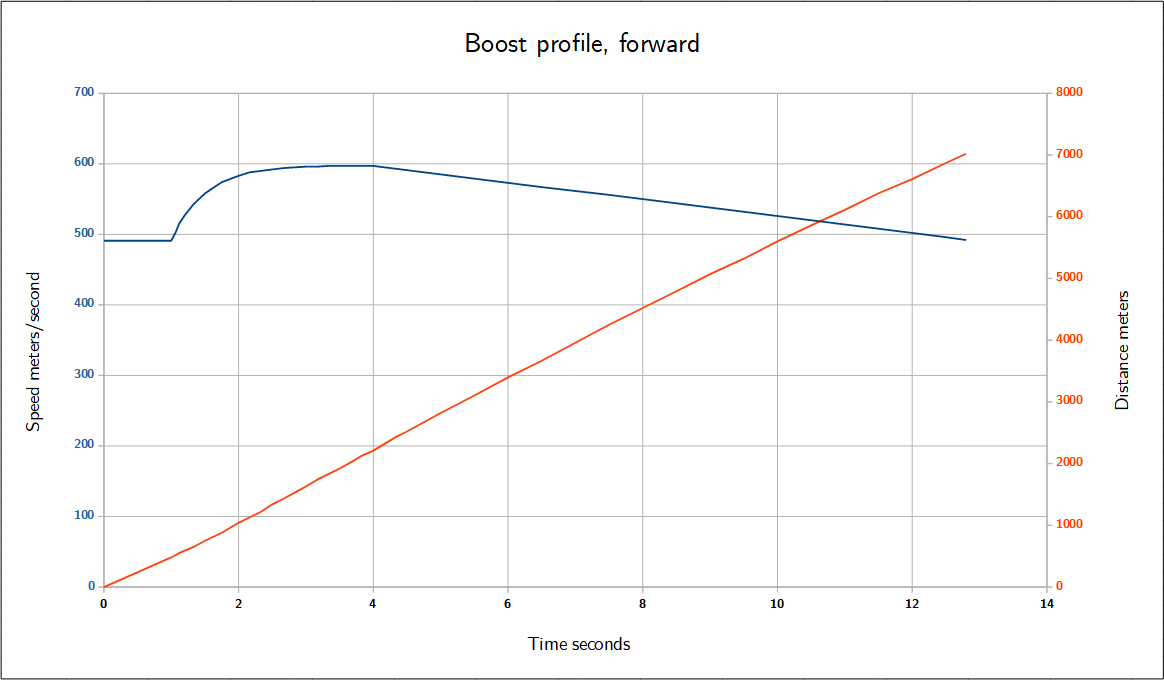
This profile does reveal a limit speed after all, where the boost effect was still active but could not breach 597. The starship has a two-tier safety system, with a higher threshold afforded temporarily during a boost. It also reveals that the ramp-down from before is actually not a fixed one-tick interval, rather that the primary acceleration occurs for at least two ticks but diminishes when the present speed has breached the original safe maximum, which it took exactly one tick to reach from stationary.
This should call into question the earlier appearance of a weak acceleration interval; it should seem far more likely that it is all part of a single interval of three ticks. Try it once more from a state of moving backward at maximum speed.
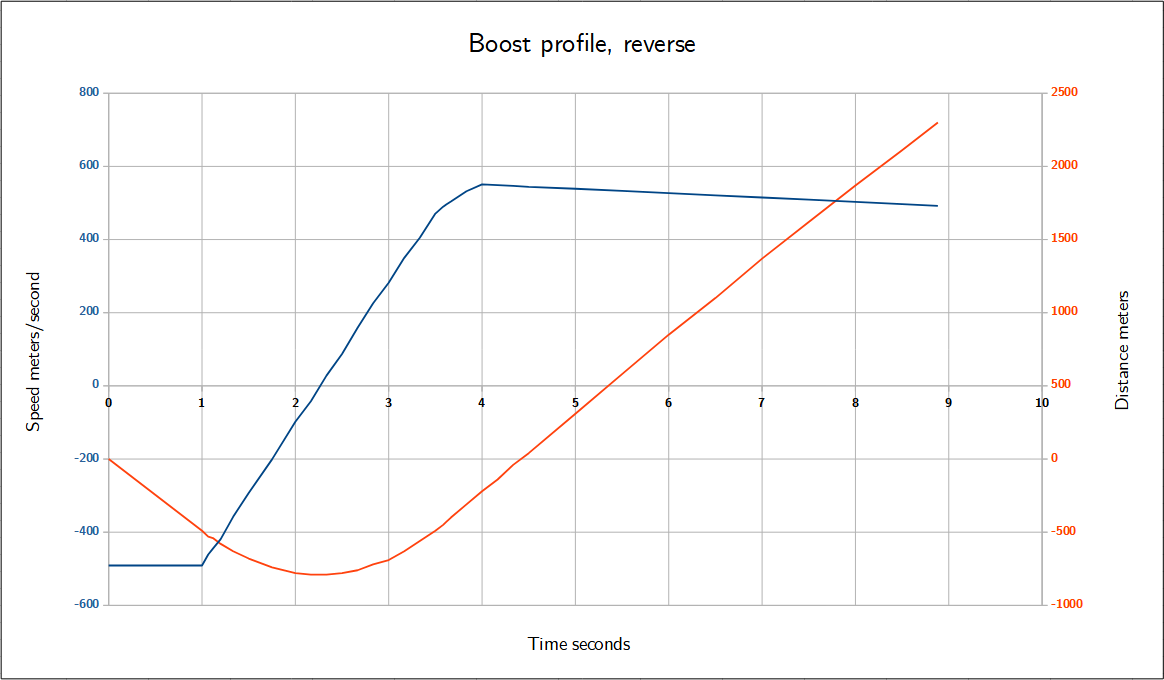
As suspected, the primary acceleration now continues well into that third tick, only diminishing slightly for a half-tick before the effect expires. We can see that boosting does not necessarily leave you moving quickly, and changing direction is just as valid a use of it as is rapid forward movement. You will find that different starships have different boost profiles, and some light starships are fast enough and have a boost effect short enough that one boost may not actually be enough to decelerate fully.
Rotations
Use Flight Assist to get yourself a little way out of the asteroid ring, then level your starship by treating the ring edge as a form of horizon reference such that you have plenty of forward space. Get your speed up into the optimal zone, then perform a full front-flip with Flight Assist disabled to get a feel for how much time it takes.
8.35 seconds from beginning the flip until crossing the horizon. Increase the speed to maximum, then perform the same experiment.
18.68 seconds; much slower, as expected while not at optimal speed. Finally, try it one more time with a boost, initiating the rotation as the boost effect starts.
6.25 seconds, even a little faster than while at optimal speed, but more importantly it was significantly faster than while at other speeds. Triggering a boost gives us instant rotation as well as instant acceleration.
Laterals
Laterals is a term I use to refer collectively to the horizontal and vertical thrusters. With Flight Assist enabled and moving back into the ring again, point yourself towards a nearby asteroid. Without touching the flight stick, trigger a boost then use your lateral thrust to avoid the asteroid.
Ensure that you are comfortable doing this with vertical as well as horizontal, and also with both together.
The ability to affect the boost direction is extremely liberating, especially when combined with its enhanced rotation speed. Rather than having to worry about which way the starship is pointing prior to activating the boost, it is almost as if we can just press the boost button first then attend to the specifics of actual direction afterwards. Thus far, we are still a bit limited in what directions we can choose, and the excess speed is seldom welcome when using a boost this way. However, we have also not quite expended all of the starship functions yet.
Landing gear
Having docked at several Starports before, I imagine you have noticed that deploying the landing gear changes the thrust profile. It imposes a significant reduction in maximum speed, although it does also retune the laterals for powerful fine control.

This opens a line of inquiry. If the maximum speed is increased via boost but decreased via landing gear, what happens if both are used simultaneously? The boost trigger is disabled while landing gear is deployed, but what if we trigger the boost first then deploy landing gear during the effect? Can landing gear be deployed during a boost? If so, which maximum speed takes effect, or do they combine or cancel somehow?
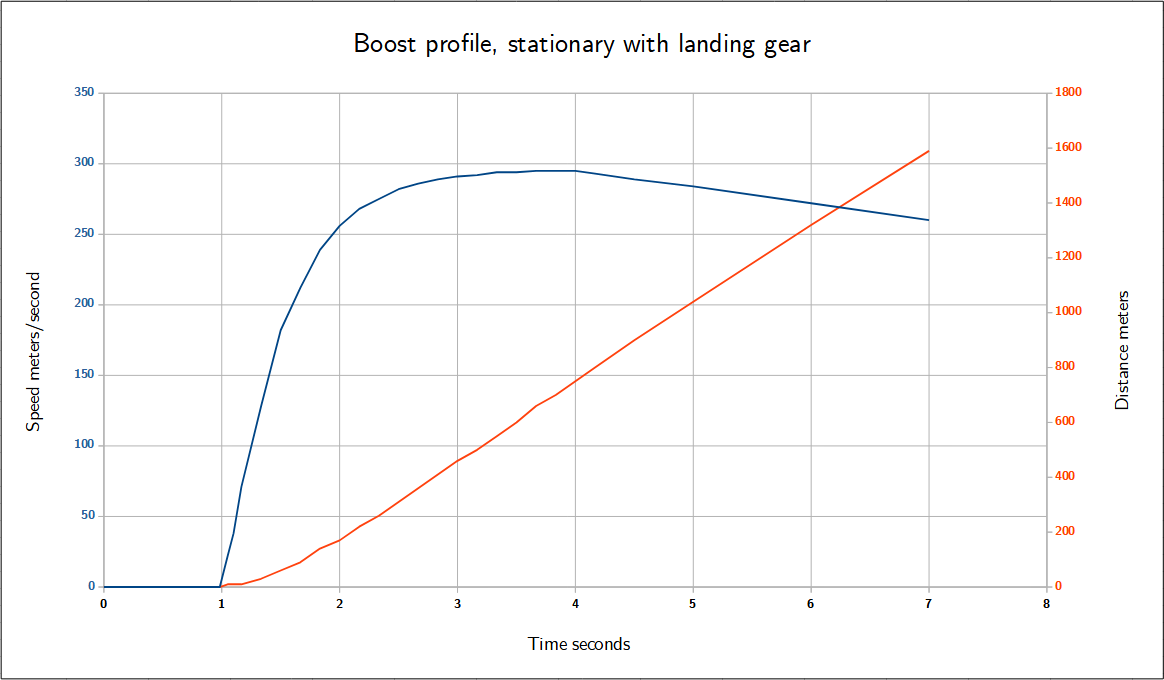
It turns out that they combine, with my 246 landing gear maximum speed increasing to 295, a similar proportional gain as with the standard maximum speed. Crucially, the acceleration remains the same as without the landing gear, which means we now have a way to enjoy that aspect of a boost without incurring excess speed.
This is one of the most beautiful interactions a pilot can discover. It is so elegant and has such a breadth of application that I have a dedicated name for it: boost attenuation, or often simply attenuation. We absolutely can deploy the landing gear during a boost as a means of enjoying its acceleration while limiting its velocity, or even pulse the landing gear to allow some of that propulsion through, then ultimately retract the landing gear as the boost effect expires to regain our normal thruster operation.
Try attenuating a boost then pulsing the landing gear to achieve a slightly faster final speed.
There are no limitations on stemming and freeing the boost acceleration this way; you have total control of the pulse duration, how many or how few pulses you use, and how well-timed they are in response to your surroundings.
Just as with normal boosting, we can also use this to counteract existing unwanted velocity. By some combination of aiming the starship nose and invoking its laterals, boosting anywhere between sideways and backwards will redirect the original velocity completely, and even boosting diagonally towards the original direction will slow it down partially when attenuated via landing gear.
Enable Flight Assist, then use an attenuated boost with laterals to make a controlled turn around an asteroid. Your lateral thrust should be into the turn, as if mimicking a strong gravitational force pulling you towards the middle of the asteroid.
We can use this to boost at almost any moment we please and end up moving in any direction needed with very little consequence or overhead slip during the turn. The final speed even ends up in the optimal acceleration zone, making this style of boosting a very natural and beneficial procedure.
Note that the Cargo Scoop can also be used for this purpose, however this is not ideal due to its extra power consumption. Disabling the Cargo Scoop can very often afford the starship an Armoured Power Plant rather than Overcharged, or at least reduce the Overcharged grade required. It is best that pilots train themselves to attenuate via landing gear, given that this is always available regardless of power management.
One final caution, however. Despite the overwhelming temptation, do not use this procedure to redirect into the docking area of an Imperial Starport. Unless otherwise directed by the Imperial Flight Operations Bureau, the maximum permissible speed in or around our Starports is 100 meters per second, and all Commanders are expected to verify that the Flight Corridor is clear before committing to traverse it. Boost emissions are also unwelcome within the docking area, and proposals are being considered which will impose a triple fine for irradiation, speeding and a noise violation.
Conversely, when flying around your own Fleet Carrier you may do as you please.
Distributor
Everything up until now has been limited to the context of having set maximum ENG power, giving the greatest possible speed, acceleration and rotation. In combat, we need to be able to switch quickly between WEP for sustaining a Beam Laser, SYS for mitigating shield damage, and ENG for making those quick turns in between.
Reset your distributor, maximise WEP, then develop a qualitative understanding of how much more time an attenuated boost turn will require. Do this both with and without Flight Assist.
With Flight Assist enabled, set maximum throttle and observe how using WEP versus using ENG makes an immediate difference to your normal rotation rate without boosting.
With Flight Assist disabled, attain maximum speed and observe again how WEP cannot rotate as fast as ENG, but also that a rotation initiated while at maximum ENG will continue even if you then reassign your distributor back to WEP.
Now reintroduce the attenuated boost; start with Flight Assist disabled and maximum WEP, use maximum ENG during the boost effect, then return it to WEP after you have achieved the peak rotation rate.
That was a lot of button-pushes, but you can see that it pays off. When Flight Assist is disabled, any amount of rotation you induce is yours to keep, even if you lose the original means to do so.
Always remember that you still need to manage the actual capacitor charge, even if your reason for boosting did not need ENG maximised. In a Mamba with WEP maximised, your Power Distributor should be able to supply two boosts before you will need to shift power to ENG anyway, unless you are sure you will be done boosting for a while.
Practice
Time to piece together all of the above, just with ENG maximised for now. Start by overshooting your target, then use an attenuated boost with lateral thrust and rotation with Flight Assist disabled to stop and face the other direction as swiftly as possible.
This is an important procedure which you should practise multiple times and at multiple angles. To be very clear:
- Deploy landing gear when the boost starts, and disable Flight Assist if you need to turn quickly or by a large amount.
- Use pitch to turn, and use roll to correct your pitch arc with the help of your radar. Remember to counter the roll if Flight Assist is disabled.
- Use lateral thrust in the direction of the turn.
- Enable Flight Assist when you want to stop rotating.
- Retract landing gear when the boost ends, or earlier if you want to free some propulsion.
It can take a while to establish that sequence in your mind, especially given that it ends with a different order depending on whether you want to stop rotating during or after the boost interval. You may want to allow the strong rotation to continue well after the boost is done, something which Flight Assist will prevent. If you only ever disable Flight Assist for one purpose in your piloting career, please let it be for this. It is only for a few seconds at a time, and the extra pitch rate is a luscious luxury you will never wish to relinquish.
Once you are comfortable with that, try introducing Power Distributor management:
- Begin with Flight Assist enabled and maximum WEP.
- Perform an attenuated boost turn with laterals, Flight Assist disabled and maximum ENG.
- Enable Flight Assist to stop rotating, and restore maximum WEP as soon as you can.
Ironically, I find that the most difficult part of practising something like that in a non-hostile environment is exactly that—being non-hostile, it costs extra thought burden to imagine the scenario, and one lacks the usual associations between the intended action and the appropriate distributor setting. The changes between ENG and WEP will come to you more naturally when you are forced to associate ENG with turning faster than another starship can, and WEP with tearing it apart.
That was somewhat taxing, so I will ease the pressure a bit. We are at the last couple of applied examples for now, for which you may restore maximum ENG and leave it there.
Respond to an accidental or mistaken boost with attenuation, rotation and laterals, but leave Flight Assist enabled to retain its stabilising effect. Spinning throughout the boost with outward lateral thrust will result in a total integrated acceleration close to zero, almost entirely negating its consequences, resulting in what we can call a null boost.
If you recall the earlier profiles, an standard forward boost would result in several thousand meters of movement, whereas here you can see that I ended up moving forward barely more than a hundred. The same procedure can also help bring you to a stop if you aim the spinning boost vector to be sideways to your direction of motion, where the perpendicularity causes an absorption effect, which we can call a stop boost.
This concludes the structured demonstrations for the flight chapter; if any of this was new to you, or has at least freed you from prior limitation or opened new potential in some way, then please accept my warmest congratulations.
While you are here, relax a bit and have some fun with using your boost function to traverse the asteroids along any route you desire, and choose any appropriate combination of landing gear, laterals, rotation and Flight Assist for each boost as needed. Make turns which come progressively closer to the asteroids; as close as you are able to manage without colliding. If you feel comfortable with it, disable Flight Assist more often so that you can rotate faster and drift around without having to face your direction of motion.
We will not be fighting pirates that way, but we will be making extensive use of all of the same concepts. Hone well the toggling of Flight Assist and landing gear twice during most boosts; you will need to be able to do that fluidly, and with time to spare for managing your Power Distributor, your Fire Groups and your targeting.
Afterword
In general, you should find that you can associate disabling Flight Assist with turning or drifting, enabling Flight Assist with steadying or stopping, normal boosts with speed, and attenuated boosts with control. We are going to exploit this repeatedly and relentlessly to get close, remain close, and ruin our targets before a heavy would ever have time to turn around.
Earlier in this chapter, I claimed that no single concise sentence will ever describe the boost function completely. Even if so, I find it acutely dissatisfying not to attempt something approaching that as an example, so here goes:
The boost function uses ENG capacitor charge to trigger a delayed effect which increases maximum speed, provides an interval of fast acceleration which diminishes beyond the original maximum speed but is never less than a small amount, can be redirected via lateral thrust and attenuated via landing gear but not via removing ENG power, and increases rotation speed which can be enhanced via disabling Flight Assist and via supplying ENG power but is not impacted by landing gear, such that it can be used to increase speed, decrease speed, change direction, and change rotation quickly.
Try putting that on the Pilots' Federation exam and see how far you get.